Travelling to China anytime soon and need to access Facebook, Gmail, Instagram, etc? Or just want to stay safe while at Starbucks? You’re in luck. Here’s a proven way to do it. (tested Sept 2019 from China).

I had an old MacBook air lying around, so a lot of this guide will be written in the MacOS flavor of Linux, with typical apt get or yum install commands substituted with brew install instead.
What you’ll need:
1. Some kind of a computer that will be online all the time.. whether that’s in the cloud or your own home network, that’s up to you.
2. Some kind of stable IP address, either with a public IP via your cloud provider, or a dynamic IP address through a site like no-ip.com
3. Internet connection? obviously? haha
4. Access to your router, if you are doing it on your home network
Getting started:
1. Setup a static IP on your router for your server – so your it doesn’t keep changing
2. Forward/open one port through your router/firewall to your server, anything you’d like. 443 if you want to be sneaky (but you don’t have to).
Setting up the server:
1. Download Easy-rsa, obfsproxy, and OpenVPN
brew install openssl openvpn obfsproxy
2. Go to the folder where all this was installed, usually /usr/local/Cellar. Generate your private and public keys for the server, and the client with easyrsa, use pretty much the following commands, along with whatever inputs it asks for
Mac:
– easyrsa build-ca
– easyrsa build-server-full
– easyrsa gen-dh 2048
Linux:
./easyrsa init-pki
./easyrsa build-ca
./easyrsa gen-req servername nopass
./easyrsa sign-req server servername
./easyrsa gen-req client-01 nopass
./easyrsa sign-req client client-02
3. Setup the server.conf file for openvpn (sample below).
*Note, that askpass line is optional, if you want to store your password in cleartext so you don’t have to type it in everytime, you can use it.
dev tun
port 32412
proto tcp
ca /usr/local/Cellar/openvpn/2.4.7_1/pki/ca.crt
cert /usr/local/Cellar/openvpn/2.4.7_1/pki/issued/server.crt
key /usr/local/Cellar/openvpn/2.4.7_1/pki/private/server.key
dh /usr/local/Cellar/openvpn/2.4.7_1/pki/dh.pem
#askpass /Users/VPN/Documents/server.pass
server 10.8.0.0 255.255.255.0
push “redirect-gateway def1 bypass-dhcp”
push “dhcp-option DNS 8.8.8.8” push “dhcp-option DNS 8.8.4.4”
ifconfig-pool-persist /tmp/ipp.txt
keepalive 10 120
comp-lzo
persist-key
persist-tun
status /tmp/openvpn-status.log
cipher AES-256-CBC
user nobody
group nobody
#Verbosity level
verb 3
If you want to know what any of the commands mean in this server.conf file… follow this guide which helped me through a lot of this.
4. Setup the nat-rules file (one line file with this in it):
nat on en3 from 10.8.0.0/24 to any -> (en3)
5. Allow masquerading on mac (on any other linux device this is typically done via iptables via the nat table):
sudo sysctl -w net.inet.ip.forwarding=1
sudo pfctl -F all
sudo pfctl -d
sudo pfctl -f /usr/local/Cellar/openvpn/2.4.7_1/sbin/nat-rules -e
6. Start the server with openvpn –config server.conf
7. Start obfsproxy on the server with a command like:
obfsproxy –log-min-severity=info –log-file /tmp/obfsproxy.log obfs2 –dest=127.0.0.1:32412 –shared-secret=somepassword server 0.0.0.0:9190
With any luck.. at this point, you should have a openvpn server and a proxy both listening on different ports. You actually only need to connect to the listening port on obfsproxy (which is 9190 in this example), and it will automatically reroute your traffic to the openvpn server.
Setting up the client:
1. Download OpenVPN (our client is windows) and install it.
2. Put your .ovpn (sample below) file here “C:\Program Files\OpenVPN\config\“ (or wherever you can find the config folder). I would suggest you also put your ca.crt, client.crt, and client.key here as well.
*Note.. that ddns.net address is your IP or your dynamic dns address you setup earlier.
ca ca.crt
cert client.crt
key client.key
remote YOURSERVER.ddns.net 9190
comp-lzo
client
dev tun
redirect-gateway def1
remote-cert-tls server
cipher AES-256-CBC
proto tcp
resolv-retry infinite
nobind
persist-key
persist-tun
verb 3
mute 20
socks-proxy-retry
socks-proxy 127.0.0.1 5555
3. Download python 2.7.16.. then install it
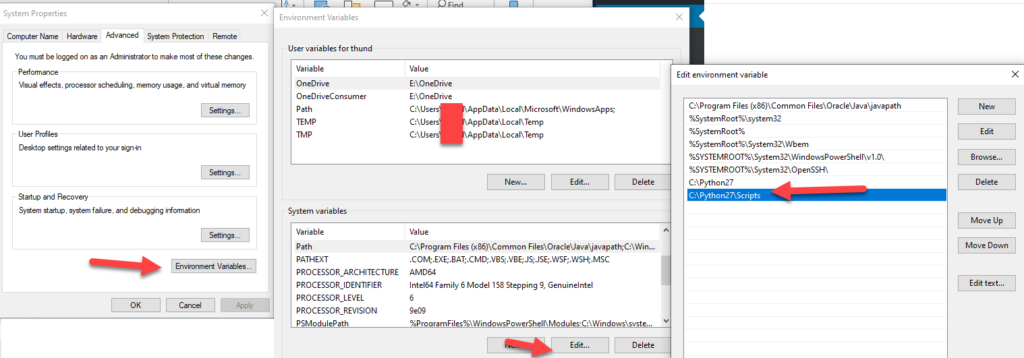
4. You may have to add environment variables by hitting start and typing environment
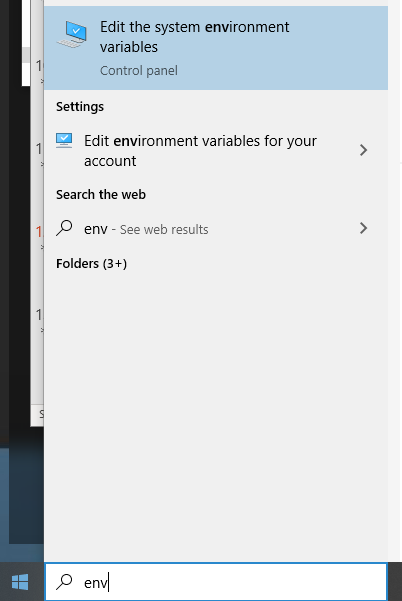
Now.. hit environment variables, then find the Path variable under system variables, and then hit edit, then add “C:\Python27” and “C:\Python27\Scripts” then hit OK 3 times.
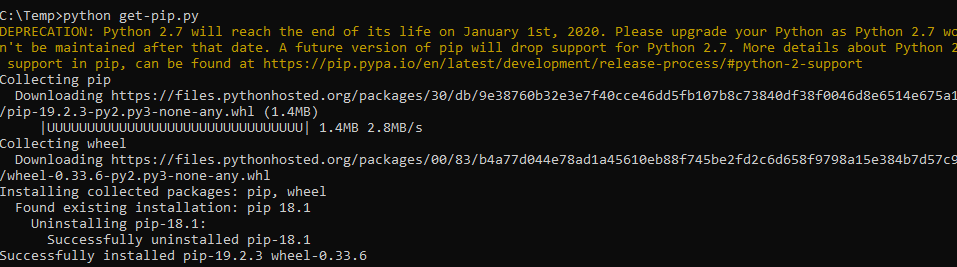
5. Get-pip.py (download that file here). Open cmd, go to the folder you downloaded that get-pip.py file earlier, and run “python get-pip.py”
6. Download and install Visual C++ 9.0 from here.
7. Type “pip install obfsproxy –user” I suggest you do this outside of China while you still have full internet access..
8. If it ran properly.. go to where it said it installed it the script:

9. You should see a file named obfsproxy.exe, if you see it, thats gooood. Onto the next step

10. Run a command in this folder to open up your obfsproxy. Make sure that shared secret is the same as the one you used on your server.
obfsproxy.exe –log-min-severity=info obfs2 –shared-secret=somepassword socks 127.0.0.1:5555
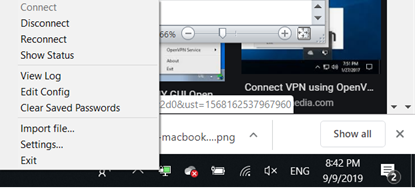
11. Now, pop open your openvpn gui and hit connect.. if everything goes well, it should light up as green and you should be connected!
Let us know if you have any questions or issues.. we’ll be happy to try and help you troubleshoot.